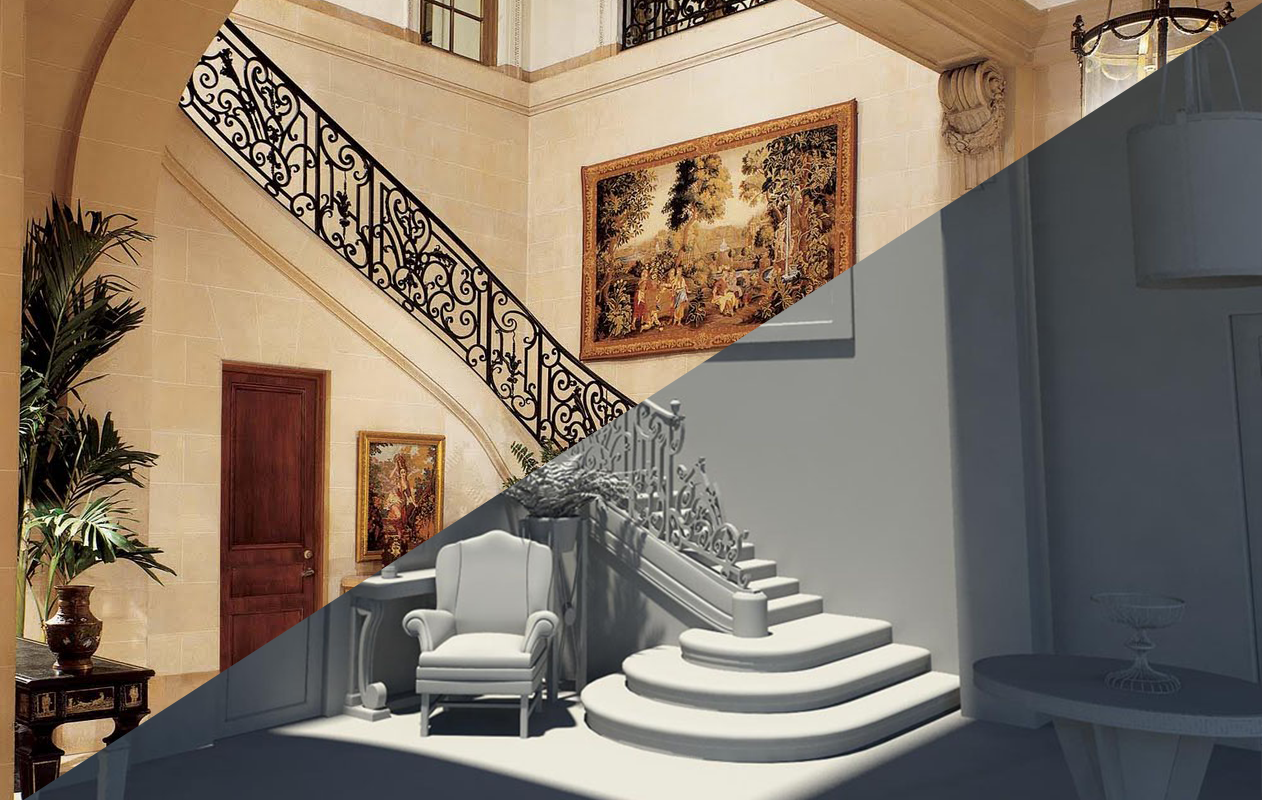
CG Modelling – Interior Foyer

The first class we really got into some modeling was MCR, or Model Creation. I was told that it was an intro to using NURB functions along with Polygon methods to create a single object, but was later changed to what you see here, to be environment creation.
So, I’m not going to lie, I’ve had previous modeling experience in Maya. I learned on Maya 5.5, and while that’s a long time ago, I still get confused where some functions are while using Maya 2009. What’s humorous about this situation is that during this class, Autodesk announced their release of Maya 2010. It’s always great to work with the latest in the field, but I honestly felt like Autodesk is going along the route of Adobe, in releasing a new package every year, whether or not changes were made. (I’m not bashing Autodesk or Adobe, I’m just saying it’s difficult to keep up-to-date with the latest software)
Anyway, this project for MCR was to recreate an environment from a collection of pictures. From the list, I didn’t really find anything I felt that would push me a little further, so with the help of Google, I found myself a nice interior foyer that has just the right amount of fanciness to it.
I decided to attack the part I deemed the hardest: the stair rail. Its elegant look really had an eye-catching twist, and really made me think in how I would attack this.


While I don’t have previous pictures, I’ll try my best to explain in detail how I achieved the rail. In Photoshop, I took the original image and cropped out the rail, and using the ‘Distort’ tool found in the transform options, I moved the points around so that instead of getting a diagonal look, I achieved a more horizontal image. After editing the photo, I saved it out and brought the image into the top camera to begin working. (I know I can use any camera, I just chose the top just for the feeling that Maya’s grid is literally the ‘ground’.)
Where to from here? I used different methods, even though you can achieve this a million different ways, I used the ‘Create Geometry Tool’ and by extruding Poly Planes. I followed the main parts of the rail, keeping to the main figure, and then adding extra edges to get into the finer detail. After I created the first initial flat piece of geometry, I extruded up once to introduce the third dimension to the geometry. After making minor tweaks and adding the ending piece that resides at the beginning of the stairs, I beveled all the edges that take place around the silhouette of the rail, to hold the edges.
As far as I’ve been familiarized in the CG world, it’s pretty darn important to have holding edges for your work, especially if it’s a hard-surface model. To make it short and sweet, the major things to keep in mind while modeling hard surface are:
- Silhouette
- Holding Edges
- Edge Flow
Wow, what a list right? Well, there’s really not much to it. Make sure the model looks good in a few angles so if someone looks at it without color, the viewer will still know what it is, and make sure the mesh is as clean as possible so there’s no stretching in the edge flow.
Phew! So, we’ve nailed that rail. No pun intended. So, moving on to other things, another very important thing in this environment would be to match the camera angle so the CG elements line up as well as possible. Much like modeling itself, there’s quite a few ways to go about getting this to work. For one thing, it’s very beneficial to have your own photo to use. I say this only because if you take the photo into Photoshop, then go to File>File Info>Camera Data. In this menu you can find some pretty useful stuff. Lens type is our major concern, to know what sort of lens was used will save you a lot of pain of trying to match a camera to any camera whose lens is far out of the 22mm-35mm lens range.
Maya has an interesting sense in its perspective view, but as soon as you figure out the lens type, you can import the image plane into a new camera, and keeping the grid in mind of the floor placement, move the camera and change the lens type to get into position. Some things to help would be to place some cubes or cylinders on the grid just to keep as stand-in objects.
Finally, the camera is matched. Now it’s just a process of looking at the picture, and seeing what you have to model to fill the render as well as you can. It’s really hard to match the camera angle for certain, and in the end you can take your own spin on things.
Matching the lighting and applying texture wasn’t a major concern in this class. I added a simple Sun and Sky light set up to give an appealing look to the overall shot. You can also take note of a few inconsistencies, such as the placement and size of things, and the lack of some surfaces. But for being our first real modeling class and the first time I actually learned by a teacher, which I’m only accustomed to reading books and doing tutorials.
The original file was completed on 09/26/2009.
So, there’s the summary of Model Creation. If you have any questions or comments shoot me an email or leave a comment below. Thanks!

